From RROCA-info
The Reconstruction of 42G7
by Nigel Steele Scott, 1989
42G7 was received as the 30th "20" chassis on test in November, 1922 and its chassis cards were originally marked with the number 51 and Goshawk 11". The chassis No. (42G7 = 27) correlates well with the engine No. G130 and all the major components of the car have the correct numbers. The G and other letters of the Twenty chassis are drawn from the original name for the car "Goshawk," a name later used together with those of other birds of prey to name aeroplane engines. The car was designated as the Adelaide trials car (i.e. demonstrator) for the Adelaide office of Dalgety Australia and it left Lillie Hall in chassis form for Adelaide via Port Melbourne in January, 1923. As far as 1 can tell it did not arrive in Adelaide until 1950. (An extraordinarily extended transit time, even for those days! - Ed.)
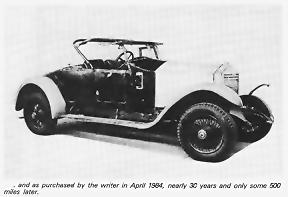
There is no record of the body fitted in Australia, but I have no reason to suspect it is any other than the two seater drophead coupe, roadster or phaeton (the name depends on your particular prejudice) by Burlington Coachbuilders of Burwood Road, Hawthorn, Melbourne. The construction is aluminium on an Australian oak frame and the style including the door framing and lack of a chassis valance panel match bodies of a similar age by the same coachbuilder.
The first owner was recorded as Mr. F. Leith of Hawthorn Road, Kew, but no delivery date is given. Mr. Leith died in the '60s and his nephew remembers seeing the car in Warburton as a child. I have found no other trace of the car until it turned up in Adelaide in 1950, brought over from Melbourne by Edward Godfrey and Rob Howard, well known in the Adelaide vintage car arena. It subsequently changed hands fairly rapidly and its owners included D. Knox, Lionel Renfrey (who has always owned at least one Rolls-Royce), Andrew McIntosh and, in 1956, John Tyley. Tyley took the car to Naracoorte and then Mt. Gambier, but only drove it 4-500 miles before deciding to rebuild it. Over the next 25 years he dismantled it to its component parts leaving only some of the engine and gearbox intact and the wheels on the chassis. After his death the car was auctioned in Adelaide. The body was crudely assembled on the chassis and the rest in pieces around it. After deciding that most of it was there I put my hand up at the auction and bought it in March 1984.
In the event it turned out that while most of the car was there, most of it needed repairing. Tyley had replaced the spring shackles and bushes, and king pins. Together with the front wheel bearings, these were the only items on the car that did not require attention. After some minor fiddling, work started seriously in January 1986 with the aim of driving the car to Canberra in March 1988.
The chassis and suspension
The chassis was bent and lozenged as the result of NSF and OSR collisions. These proved surprisingly easy to correct. A morning at my friendly crash repairer with the chassis chained to the floor, heat and a porta-power soon had that fixed. It then became obvious that the springs needed resetting and this was carried out to the original specifications from chassis cards. This looked fine until the car was completely assembled when it was 3/4 " down on the OSF. Over the springmakers objections I had the loaded setting of this spring altered and all now measures up square.
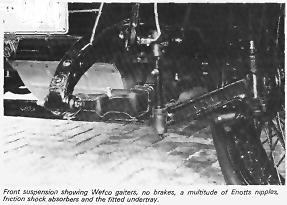
New spring gaiters were obtained from Wefco the original suppliers. I also had the numerous odd holes in the chassis welded up and repaired and refitted a set of correct shock absorbers to replace the odd collection that had been fitted over yhe years. The undertray was torn and part missing but I was able to construct a new one including the side plates and overcentre locks. The juxtaposition of copper and aluminium in this structure is a nono and I can only assume it is an electrochemical joke of Royce's! While the undertray is easy to fit to the chassis in the absence of engine and body, every nasty thing written about it is true once the car is assembled. It was also necessary to turn up large numbers of square headed bolts as most seemed to have been lost.
The whole chassis was painted in two-pack black, a finish that I have found very resistant to chipping, oils and handling. Enotts nipples were easy enough to come by once I had made enough caps to offer 1 cap for 3 nipples. I also now have a tool for - naking or reinstating the threads on the caps and have not lost one since. If your nipple caps are loose I can help you.
The wheels of the car had been cut down at some time to 119" wellbase and the car looked very unbalanced. After a lot of agonizing over costs I decided to put it back on 23" split rims. New rims available from the U.S.A. were too expensive. I also investigated making new wheels and although I think these early Twenties look much better balanced on the spidery wheels, I could not raise enough orders to make it worth while. I collected a set of four 23" spoked and four disc wheels. After removing the spokes and discs new centre sections were welded into one spoked rim and two very rusty rims from the disced wheel set by the local wheelwright. The other 2 disced rims were useable as was. He then dimpled, drilled and spoked these rebuilt rims to my hubs with the correct butted spokes obtained from Central Wheel Components in Birmingham. Again heat was needed, this time to straighten the split rings and these were fitted with rim locks as originally specified. Anyone who has spent time looking in the roadside bush for a split ring following a puncture would really value these. The wheels were then powder coated instead of enamelled. This has been very successful. Not only is the finish excellent, but the slightly plasticised feel of the finish has made the tyres and split rims much easier to fit and remove than from enamelled wheels. I have not chipped the paint despite numerous tyre removals which were necessary to finally get these rebuilt wheels round. As an aside one of the minor mysteries of life is how to remove the Dunlop hub nuts from the wheels - easy when you know how. Tyres and tubes (5.00 x 23) come from Australia's own (via Taiwan) Beaded Edge Tyre Co. of Newcastle, NSW.
Steering
Tyley had purchased new balls and cups for the steering joints and after fitting these it became clear that the steering box was worn. Here was a design fault. The outer bearing of the box was fitted without a seal. As a result new bearings were badly needed and the yoke in the worm had to be built up.
To move forwards in my story all these repairs to the chassis have resulted in a car which is light and precise in its handling and even by today's standards, quick on a winding road.
Electrical
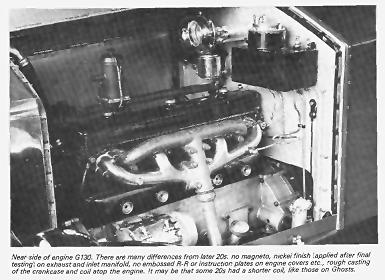
After fitting new brushes and bearings, the generator and starter motor checked out OK with an auto electrician. I had enough of the fittings for the electrical conduit to have more cast up to replace the ones that had rotted or disappeared and at the same time I had new headlamp mountings cast from those on John Scammel's Barker Tourer 53S7. This was easier than fabricating new ones and if I had not told you, you would not know by looking at them. Aluminium tube of the original section for the conduit is still available and this was fitted up to the mountings, new wiring to the original pattern threaded through and the junctions fitted. Because of some modernisations I made (see later) this was all a fairly tight squeeze. Peter Perrow helped me to locate exact R-R pattern wiring in the U.S.A.
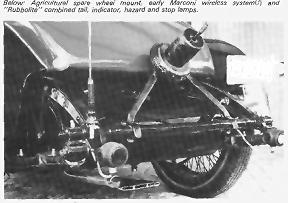
In addition to the minimal electrical fittings originally supplied with 42G7 I made some concessions to being seen and being able to see. I fitted a pair of "Rubbolite" Divers helmets to the rear, and behind the headlamp lens the reflectors from Lucas P700 lamps with Quartz Halide bulbs. These are dipped from a floor mounted switch fitted by a previous owner via a light duty line to a relay mounted in each lamp. This latter because of the aforementioned crowded conduit. The side lamps and taillamps were fitted with double filament bulbs, and a small circuit board made up and mounted on the scuttle high up inside the car. This allows operation of the stop lamp filaments together with the second filament of the side lights as indicator lights in the manner that was common in the '50s. A separate switch for each side means both can be turned on to provide hazard warning lights. This may or may not be legal in various parts of the world, but it is very effective.
These arrangements put the circuit in a net deficit of about 8 amps at speed at night - but with a big battery this is not a problem. I recently completed a 200 mile run down the Hume Highway at night at 50 m.p.h., in comfort and safety.
The body
The aluminium skin was removed from the frame and carefully straightened after suitable annealing. I found a skilled aluminium welder to replace or repair torn sections. The woodwork needed replacing in the scuttle and running boards because of rot, and at the back because of accidents, and this was done using matching Australian oak. The body was originally fitted as one piece so of course it had split at the door frames. Rather than repeat this mistake I swaged in separate panels under each door. The mudguards were particularly bad due to a combination of bog and botching. I was fortunate to find John Webb, a self confessed "aluminium freak," who for many years built the bodies for Elfin cars, and he reconstructed the mudguards to a point where I could finish them for painting.
The whole body was now assembled on the chassis including the windscreen and the hood frame, the latter being fitted with oversize hinge pins and new bows. This body assembly is the part of a rebuild at which I have found the job is made or broken, and hours were spent hanging doors, blocking up body mounts and fitting the mudguards, bonnet, etc. The longest part was the final finishing of the body, ready for painting and here I enlisted the help of my brother's father-in-law Giovanni Cardoni, a retired panel beater. After refitting on the frame the body was still not perfect and in some places was too thin to withstand further metal working, so, some plastic filler was used, together with two pack undercoat to get a perfect surface for painting. With framed bodies I find it difficult to get a perfect finish without filling some spots, but I made a rule never to use more than 0.5mm of fill. The bonnet had been battered and apart from straightening it, new nickel silver rivets were cold formed with a rivet snap to repair hinges and locks and a new webbing antirattle strip fitted to the bottom of the drop panels with aluminium rivets (correct for early '20s).
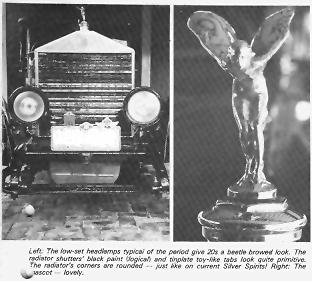
Probably the hardest job was to make new radiator shutters to replace those that had been irreparably damaged or botched. A die and stamp were made up with hardwood blocks, edged with steel, and the shape pressed out with an hydraulic bearing press from tin plate as original. The slots and shapes required were obtained by patient drilling and filing and the shutters finally painted black. The local radiator shop dismantled the radiator so the shell could be repaired, and I bought a new core back from Great Western Radiators in my suitcase after a visit to the U. K.
When I was finally satisfied that it was all perfect I dismantled the body again - I think some parts must have been off 20 times or more. The major pieces were taken off to a professional painter and all small pieces 1 painted myself with. borrowed equipment. The mudguards, lamps, radiator shutters, mechanical parts, etc. were done in two-pack black (if you do this yourself be sure to wear breathing equipment) and the body in an early '70s Volvo Royal acrylic. I should add that before painting the body the hood and upholstery were made by a professional with my assistance as dogsbody.
These preparations were well worth while, and meant that the final assembly of the car went smoothly, with no damage to the new paint.
The engine
This is the heart of your car and if it does not run well all is lost the minute you start up. I have found this true of all restorations and it is much more important than money. As far as the engine is concerned, apart from the work requiring machine ery you can do it all yourself. As well as taking care yourself you will need to emphasise again and again three things to the professionals. They are all obvious but to do them well to R-R tolerances requires more time and you must be prepared to explain to your recondition er that you want and will pay for the extra care involved (if necessary).
These things are absolutely critical:
- Make sure the crankshaft is straight, the journals centered, and all the bearings ground true to the specifications in Haynes and Grigsby.
- The refaced block and head are bolted at the correct tensions to the crankcase before any bearing boring is done to minimize distortion of the crankcase.
- The main bearings are bored exactly central to ensure quiet timing gear.
Following complete disassembly of the engine it was roughly cleaned before fitting up the crankshaft and bearings and then properly cleaned before final assembly. Every oilway was blocked to some extent, and no oil had been through the bypass system for many miles, so the rocker gear and timing bearings were completely worn out.
Descaling the head and block is not for the faint hearted. I used 10 litres of hydrochloric acid. Eventually I took out all the core plugs after use of heat, home-made spanners and truly enormous levers. As well as the acid 1 used a variety of scrapers shaped to fit the funny nooks and crannies in the castings. In the end water should flow freely through all parts of the block including around the cylinders and copper tubes, for their full length and above and below the inlet manifold.
Following all this activity it turned out that electrolysis had been at the copper tubes over the years. These were driven out with a piloted drift and replaced with new tubes made from hardened tube cut to length and annealed at the ends before swaging into place with a tool turned up to match the taper in the castings. Just to be on the safe side I used a stud sealing compound on these joints as well. The block was then ready for boring to 0.04" oversize to fit new pistons from Hepworth's.
The valves were in good order but the guides badly worn. The head, despite the prodigious amount of scale, was not cracked, so I had the old guides pushed out and new guides from a Datsun 180 engine fitted as these will accept proper stem seals. There is now available in Australia a process for relining valve guides and had that been available at the time I would have used it on the old guides despite the poor sealing system. The recommended modifications to the head, blocking of six of the front waterways to ensure full water circulation, were also made.
I also found in Adelaide an independent coolant manufacturer with an excellent understanding of the problems of preserving old castings and cooling systems with such a variety of metals involved. He has tailor-made coolants for each of my old cars to allow for their individual frailties. I believe it is very risky to use modern coolants, off the shelf, without first making extensive enquiries about their suitability for your engine. There have also been big improvements in coolant chemistry in recent years, so I am not happy to use some of the older RR recommendations either.
The camshaft and bearings were the only part of the engine not worn and after cleaning they were replaced together with new cam followers and the block was fitted to the crankcase. At this stage it all became so heavy that I had to make up an engine stand on wheels well worth it. The head was bolted on and after balancing, the pistons, rods and crankshaft fitted. I had the oil scroll ground off the rear of the crankshaft to 2.687" and the seal housings modified to take a standard neoprene oil seal (Mopar 4240044-ex Chrysler 360,318cu. motor). This has not been wonderfully successful, and I still get 2-3 drops of oil every 100 miles, which is quite enough to make a mess. Everything was assembled with lots of oil.
The starter teeth on the flywheel were nearly worn away in places and these were built up by a skilled welder and I carefully ground them to profile with a small angle grinder. Once the flywheel was fitted it was possible to fit the timing gear after resetting the harmonic damper (seized) as described by Haynes and Grigsby. The rocker gear was repaired by hard chroming the shaft to an oversize that allowed the rockers, spacers and castles to be bored to fit, rather than making new bushes. Tyley had had the distributor repaired and I refaced the oil pump to original tolerances, ground the shaft of the water pump and fitted new bushes and seals before assembling this section of the engine. At this stage I made careful check of the timing. All was well, so my marking during dismantling was alright.
Apart from the head and manifold gaskets which were made locally I cut all gaskets myself and fitted them with sealing compound where appropriate. The tappets were adjusted, carburettor and manifold added, all moving parts anointed with oil again and after addition of the clutch and gearbox the assembly set aside to await the body.
The clutch plate was cracked and a new one was obtained from Appleyards while new facings were obtained at the local clutch specialist. New bearings replaced the old ones in the gearbox, which were in poor condition. On t e 1st/3rd motion shaft bearing, the inner journal was badly worn. This was hard chromed up to fit the bearing rollers which, fortunately, were in good order.
The coming together
The engine, gearbox and propeller shaft were fitted and the brakes, electrics, fuel lines, etc. all connected for the last time. As the body came back from the painter, it was fitted piece by piece. A new exhaust system was made up from the general arrangement drawings by a local exhaust specialist, after I made up mandrels for the ends. The biggest problem was sorting out, fitting up and adjusting all the control rods which had come as a jumble in a box. Several were missing and I had to make new ones. Although I knew where they all went, it took days to get them right.
Once the body was fitted and the instruments connected it was time to start up. No drama at all. I turned the engine over with the starter until the oil pressure came up, then turned on the ignition, set the controls as described in the instruction book, pressed the starter ... there was a faint gasp from the carburettor the engine started and immediately ran quietly and smoothly. That was that. All that was needed subsequently was minor adjustment to timing and mixture.
The rest of the body and the upholstery were fitted and off we went road testing. One major problem arose. I had receipts showing that Tyley had had the brakes and differential overhauled and I had seen the new linings when adjusting the brakes and repairing the hub nut locks - yes even they were damaged! Nevertheless there was a terrible differential whine at most speeds.
All this assembly work began during my two week Christmas holiday in January._~ and we were due to start for Canberra in the Australian Bicentennial Rally on March 9th. By now it was mid-February, so out came the differential one Saturday. Clearly no work had been done on it and every bearing including the wheel bearings had to be replaced. The pinion drive keys had been sheared, damaging the propeller shaft mounting and this had to be repaired. This was done in a local machine shop together with refacing the thrust washers and all the bearings were also found locally, ready for assembly the following weekend.
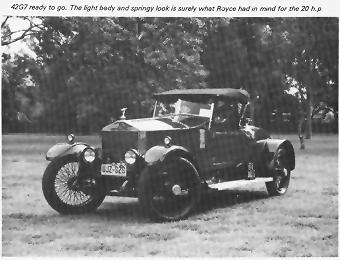
This proved to be the last drama. The car ran reliably and well over some 3000 miles in the next three weeks and cruised comfortably at 45-50 m.p.h. The light aluminium body means that this car has none of the slow-coach labels applied to the 20 h.p. generally. It is a fast vintage tourer and would be even better if someone could find me a high ratio crown wheel and pinion. Does anybody have one?
Over the Rally period the only troubles were a persistent slight compression leak in the head gasket which lead to overheating on very hot days, a failure in one of the new generator bearings and two weld failures in my rebuilt wheels. These latter were my fault in that had I inspected the welds properly before painting the wheels I would have seen the faults. As said, you get as good as you supervise. The most disturbing problem of all was that the clock stopped the day we arrived in Canberra!
Summary
I have to thank a wide range of friendly people for help in the whole exercise. Apart from those already mentioned, members of the RREC, RROC and The Sporting Car Club of S.A., I also have to give particular thanks to my colleague lan Hancox for the many lunchtimes he spent helping me with advice and those myriad small machining jobs so important to accuracy and authenticity.
I now have a delightful, light, quick, comfortable and elegant vintage tourer and I had a lot of fun getting it that way.


